Archive
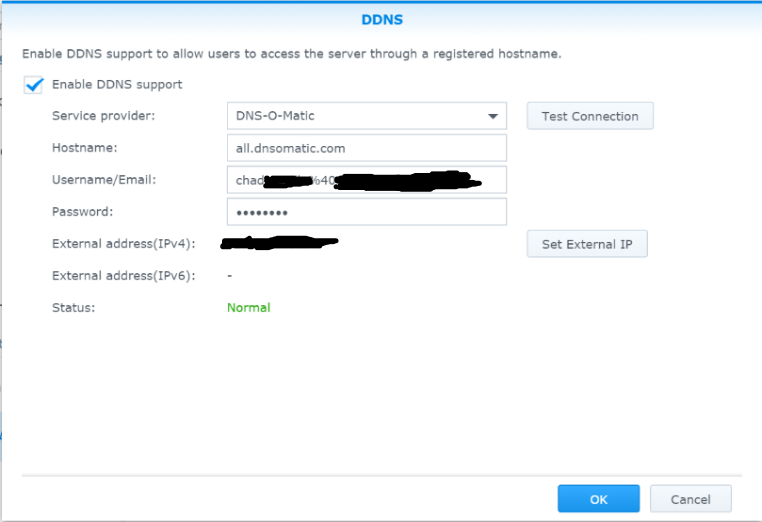
Synology Diskstation DDNS DNS-O-Matic fix: Don’t use the “@” sign!
I haven’t posted about this before, but I’m a HUGE Synology fan. I have had their DS210j server for about 5 years now and I absolutely adore it. Its slow now since its 5 years old and the server software has significantly improved, but it still keeps chugging along! My partner moved in about a year ago and he brought with him an Apple Airport wireless router, that recently bit the dust. Routers just can’t seem to last very long… even if it is a timecapsule for his mac. So I went and bought a new router, the TP-Link Archer C9 as recommended by The Wirecutter. The article specifically recommends the Archer C7… but a higher number can’t be bad can it?
So I purchased the router, got it set up.. and since this is not a locked down Airport, I can start using OpenDNS again!!! I use OpenDNS to filter out stupid add-sites (I’m staring at you DoubleClick). The thing with OpenDNS, to take advantage of the web content filtering, you have to update your IP address. I don’t want to install a client updater on my computer, but the Synology server can do it! So I restarted my DNS-O-Matic profile… which updates OpenDNS, and set up the DNS-O-Matic DDNS updater on the Synology DS210j (follow that?). Basically:
IP Address updating:
Synology DS210j DDNS updater –> DNS-O-Matic –> OpenDNS
I set up the Synology DDNS updator with my username and password and used the hostname: all.dnsomatic.com. However, I learned of a small issue a blog that no longer exists by ‘John Alvarez’ showed me… DO NOT USE THE @ SIGN IN YOUR EMAIL ADDRESS! It took me TWO DAYS to figure this out. Good riddance. Such a simple solution but apparently there is some thing weird in the Synology updater code that requires you to use “%40” instead of the “@” sign. So, in your username, replace @ with %40 and it’ll all work out:
Amazon Unbox is No More
Well, as soon as I had posted some [good] information about Amazon Unbox, they decided to shut it down. As of March 29, 2014, it will no longer work. However, any videos you had downloaded previously will work in Windows Media Player! Here is the official notice from Amazon:

Oh well, it was fun while it lasted!
Surface Pro 3 can’t connect to Microsoft wireless display adapter (MWDA)? Here’s how to fix it.
I have a Surface Pro 3 and love it. Its what I’m using right now to write this post. The keyboard gets kind of funky but is significantly better than the previous Surface Pro keyboards and the mouse is quirky at times… however I overall really like it. I’ve been giving a lot of presentations lately and at work the computers are unfortunately locked down. I like to add some neat content to my Powerpoint presentations through add-ons and plugins, thus my ability to use my presentations on work computers means they are less neat because I can’t take advantage of features like viewing a live web page in the presentation (think live-audience polls). So I had a $15 coupon to Microsoft.com and I decided to use it to purchase the Microsoft Wireless Display Adapter, which is dubbed in all the support articles for it as MWDA. I received said product about 3 days after ordering, plugged it in, my Surface Pro 3 saw it, clicked connect, heard a ding….. then nothing. The display on the tv went back to its normal “ready to connect” wait screen.

UGH! Really? I went to support websites and followed tons of instructions ranging from uninstalling the adapter to installing all the latest updates. I DID NOT refresh my PC though. I’ve done that before, it went fine, but I’m not all about re-installing all the programs again, especially when people are saying that the refresh did not fix the problem. It turns out that the January 2015 firmware update for the Surface Pro 3 broke the MWDA something-or-other connection, as many people complained that it worked before the January update. This left me disgruntled that the January update was obviously a step back. But hey, it happens, whatever. I did however find a small blurb on page 2 of a support thread that DID work to remedy this annoyance!
Step 1: download the Surface Pro 3 – January 2015 drivers ZIP file… not the MSI file
Step 2: extract the folder to location of your choice (probably the desktop)
Step 3: open Device Manager (swipe out the Charms menu>Settings>Control Panel>type in Device Manager in the search area>Click Device Manager
Step 4: expand the Display Adapters
Step 5: right click on Intel(R) HD Graphics Family and uninstall (may not need to uninstall, but its what I did and now it all works)
Step 6: reboot
Step 7: computer will re-install what it needs to function and turn back on, this is fine. Then go back and do Step 3 again to get back to Device Manager
Step 8: expand Display Adapters again, right click on Intel HD Graphics Family, and click “Update Driver Software”
Step 9: Select “Browse my computer for driver software” and navigate it to the Intel\Graphics folder of your extracted January 2015 driver zip file.
Step 10: Click Next and continue following the prompts to complete driver update.
Step 11: reboot for good measure
After you complete all these steps, reconnect to the MWDA and now it should work! Genius! And it only took me 3 days to find the small blurb that mentioned these instructions. Luckily I didn’t refresh or I would have been livid. Cheers! Let me know if you have any questions!
Side note: go to the Windows Store app and download the Microsoft Wireless Display Adapter program, it lets you put a password on your MWDA as well as rename it, control overscan (in case the screen extends beyond the limits of your tv), and put a PIN on the MWDA to prevent people from hijacking your presentation. ;)
Update 1: I did a bit of further reading, and it turns out that some users have had success simply uninstalling the drivers for Intel(R) HD Graphics Family and rebooting. So that may be all you need to do! I’m still leaving the above instructions though, just in case.
Updated 2: Added the link to the drivers in Step 1, sorry that I didn’t have that linked earlier!
Watching Amazon Movies on the Go in Windows
Your tablet has the amazing ability to be a device of consumption. Android tablet and iPads make it amazingly easy to take your content on the go. However, we are neglecting a huge market share: Windows! What is on a large number of laptops? Windows. What is an emerging market of tablets? Windows. How do you download movies you legally own to your Android/iPad tablets to take along with you: Amazon Instant Video, Vudu, etc etc. What about Windows? *crickets* Fortunately there is a solution. For the purposes of this post, we will focus on your Amazon Videos since the software isn’t publicized very well: Amazon Unbox.

Basically, this software allows you to download the movies you own in Amazon Instant Video (not prime shows/movies) to your PC and allows you to take them with you since there is no Windows app for Amazon Instant Video like on Android/iPad. Its super easy to download, but I had to email Amazon to get the direct link.
I would like to inform you that amazon Unbox is no longer available for download on Amazon.com. But to help with this issue, I can provide a link you can use to reinstall the last supported version of the player:
http://www.amazon.com/cs/unbox/download/104
If you’re using Microsoft Vista, you may also need to install Unbox as an administrator:
1. Click the installation link above and select “Download the Unbox Video Player”
2. If prompted to run or save the file to your computer, choose the “Save” option
3. Search for the file “amazonunboxvideo.exe,” using your file browser
4. Right-click the file and select “Run As”
5. Select the “Administrator” option for running the file and follow the onscreen instructions
So, Amazon is no longer publicizing Amazon Unbox, but it still works. To make it work though, it doesn’t tell you that you do need to download Adobe Air. This is needed to play the videos you download. It doesn’t matter if you download Adobe Air first or last, but you just need to have it to play the videos.
So, want to take your Amazon Instant Videos on the go with your Windows PC? Download Unbox. You’re welcome.
UPDATE:
Amazon Unbox is no longer available as of March 29, 2015. So sad :( Below is the email I received from them:

Saving Money on Purchases During the Holiday Season
It’s the holidays, therefore you are going to spend money. Lots of it. And by lots of it, I mean if you were watching your money flow on Mint.com and you habitually see green bars (obviously showing monthly net gains because we are all SAVING money), then for November and December you will see those heinous red bars showing monthly DEFICIT! Don’t worry, even though you may end up monthly deficit because you are stretching your purchasing powers, that doesn’t mean you can’t minimize the pain felt when you click “Buy”. That is the focus of this entry, saving the most you can on online purchases during the holiday season.
Step 1: Start observing price trends
In about August-September, start formulating a plan of what you want to purchase this holiday season for either yourself or as gifts. The reason I say this is because there will be several sales between that time and the holiday season, so you will know when Black Friday rolls around whether that item on sale is actually a good deal or not. One of my favorite watching sites is SlickDeals, it has a great following and posting population.
 Example: Xbox One w/out Kinect normally costs $399. Starting November 1, they dropped to $350, and even bundle in two games (Assassin’s Creed Unity and Assassins Creed Black Flag). That is a great deal! But wait on it. Black Friday rolls around, and that price drops to $329.99. THAT’S a good deal.
So why didn’t I say to buy it on Nov. 1 when it was at $350? Because I know that around the previous February-ish, Microsoft ran sales for the Xbox One to cost about $350 during that time too. Whatever the sale is during the year, for electronics, it is likely to dip even further later on as Christmas draws closer. Same situation for memory cards, they go on sale all the time, and watching those previous sales, I know that they happen frequently, and Black Friday sales weren’t any better than normal sales so if I have the ability to wait, I can help keep my budget in the green by NOT purchasing unless I need those memory cards. There’s a certain sense of satisfaction with restraint. ;)
One last method to learn about price trends is to use websites like CamelCamelCamel.com. Go first to Amazon.com, find your product that you want, copy that web address, go to CamelCamelCamel.com, paste in there, and CamelCamelCamel will show you the prices that its had for a long time, so you can know whether you are getting a good deal or not.
Step 2: When you are ready to buy, utilize cash back methods
There are several ways to go about this. The first one is the primary method to save cash and requires a little bit of elbow grease: using online referrals. When I say online referrals, I mean sites like Fatwallet, ShopDiscover, or even Upromise. Using ShopDiscover (if you have a Discover credit card), they typically give you 5% back on a lot of online retailers (Crate and Barrel, Best Buy, Microsoft, Apple, etc). Knowing they give 5% back, I then look to Fatwallet because periodically they have even MORE back. This past summer, Fatwallet had 8% cashback for online purchases, so I purchased a Surface Pro 3 during this time, and tagged a student discount on top of it for a grand total of 18% savings! Sometimes though, Fatwallet only gives 2% back, so I know in that situation, I’m better off using ShopDiscover. The money you get from these is not immediate, it typically takes a few weeks (around 6) for the return. In the case of Fatwallet, it goes to your Fatwallet account, then you can transfer it to Paypal, which you can then transfer straight to your bank account. ShopDiscover gives you cashback to use on any number of things, one of those being straight to your credit card balance. Boom, you just made your life a bit cheaper. If you don’t have a Discover card and don’t want to use Fatwallet, you can also use Upromise. The money you earn from this you can apply to your student loan. Don’t have a student loan? Have your family members who DO have student loans set up a Upromise account, get their info, and then the money you saved by using Upromise will go to them so they can apply it to THEIR student loan…. why how nice of you!
Step 3: Use credit cards, and know when to stop.
Everyone talks about how bad credit cards are. Yes, they can get you into serious trouble really easily, but when used wisely they can save you a lot of money. During this holiday season, Discover has 5% back on all online purchases. I emailed Discover to ask if that 5% discount can be stacked on the ShopDiscover discount to earn a total of 10% (sometimes more/less) cashback… and yes, you can:
From Discover:
You will earn the 5% Cashback Bonus from October 1, until December 31, 2014, when you sign up to use your Discover card for department store purchases and for online shopping.This program allows you to earn 5% on your first $1,500 in purchases, and it’s an easy way to earn up to $75 more Cashback Bonus.And you can earn an extra 5% to 20% when you make your online purchases through our ShopDiscover page! This would be in addition to the 5% for this program
Purchases must be made by December 31. While your 5% Cashback Bonus is normally processed a few days after your purchase, we ask that you allow up to five weeks for it to post and appear on your statement. See Cashback Bonus Program Terms and Conditions for further details.
The 5% Cashback Bonus program runs yearlong with categories changing each quarter. You will be able to sign up or find more information about each new program as it becomes available in the Account Center.
Be aware of the discounts your credit cards offer. Right now I know that an AmEx is offering 2.5% back on groceries, a Mastercard is offering 5% back on gas, Discover is offering 5% back on online purchases, Amazon Visa offers 3% back on Amazon purchases (all the time) and 2% back on dining out. Knowing this information, I know which credit card to use and where/when.
The key with credit cards is to pay off your balance EVERY MONTH. Otherwise you just negated all your hard work to save money and you will actually end up paying more. If you look at your credit card annual percentage rate (APR), you will see it is likely anywhere form 12.5%-20%. At most, using the easy methods, you can save about 10%… so if you miss a payment you just ended up paying 2.5% more at best for that product… ouch.
Step 4: Pay credit card bills ON-TIME and continue watching prices
Just because you started watching around August-September, having a greater awareness of the price of items puts you in a stronger position to save more money. There are certain times of the year where you can save money on certain purchases, and utilizing these methods, you can save even MORE on those items. A hidden benefit of some credit cards is price protection. On the Discover card, if an item you purchase on your Discover card goes on sale within the next 90 days, you can capture/print/take a picture of that sale, send it to Discover, and they will cut you a check for the difference, IRREGARDLESS of where you bought it from.
Example: I bought an iPhone 5S at Apple.com and a few weeks later BestBuy.com had the exact same iPhone 5S on sale for $75 off. I printed that sale ad, contacted Discover, sent them the information, and a few weeks later I received a check for $75. After you buy a high ticket item like that, KEEP WATCHING FOR MORE SALES. Other stores like Target or Best Buy offer their own price matching. Target and Best Buy will give back the difference if within 7 days it goes on sale within their store. Eyes open people!
Closing Thoughts
Don’t forget about other discounts such as student discounts and military discounts. If you frequent outlet malls and are in the military, sometimes if you visit the outlet malls business office you can get a 10% off card for every store in that outlet mall, or the respective store will give you a discount. Same applies for student discounts, especially in college towns. If you went to college, keep your student ID because you can use it at other locations to get some handy discounts, depending on your level or honesty… but hey, its saving money so our morality can be a bit flexible with that, right? The biggest key, IMO, is to watch, wait, and strike when you can maximize your discounts. Its challenging sometimes to keep track of all of it, but that’s where CamelCamelCamel comes in with watching price trends and also the hidden price protection with credit cards or a store (like Target or Best Buy or whoever else) does the price matching post-purchase. Using these methods, you can save a lot of money. Credit Karma actually wrote a good article about maximizing credit card rewards that is worth quickly reading over if you have more time. Good luck and happy holidays!
Xbox Music and Issues Downloading Albums on Windows 8.1
So Microsoft is giving away 100 FREE albums (woot!) this holiday season. I get all excited about being able to get Katy Perry’s The Sweet Confection for free (Kayne West… yea right.. you can’t get me to listen to that even if it IS free) and when I go to download it: error. Really? I can stream my Katy Perry from Xbox Music on Windows 8.1 Pro (gotta give you the details), but I can’t download this music that I legally obtained? This will not stand, I want to listen to my Katy Perry, even if the internets goes down!
My roadblock: Error Code 0xc00d001a (0x80070035)
You would think an error code would have some sort of documentation with it. Nope. So I used Microsoft Help. I have a Surface Pro 3 and they are all about making sure customers are satisfied (which I am, for the most part). The technician was super helpful, but it still didn’t work. So I continued following some of his instructions that he sent me, the last step being which I should “refresh my PC”. Refresh your PC is a nice way of saying its going to delete all your programs. Not your files, but all your programs. Well, nothing else worked so I gave it a shot, except that didn’t work either. Several hours later I finally have all my programs re-installed (thank you internets), but I STILL couldn’t download my Katy Perry.
I continue googling the error code, and I noticed a trend that similar topics had to do with storage. I have my Surface, by default, save most media files to the micro SD card. Then it dawned on me, maybe there was an issue with Xbox Music saving to SD card, or maybe it wasn’t saving there at all! I swipe left from the right side of the screen, go to Settings>Preferences>”Choose where we look for music on this PC” and lo and behold! There are redundant sets of save locations! I delete the duplicates and/or irrelevant locations, save it and pull up my Katy Perry.

With great angst, I clicked “Download”… and now I have my Katy Perry files.
Portable Software Applications
Computer security is an important topic, especially today when installing an application on your computer could result in who-knows-what-else being installed on your computer if you are not careful when clicking all the buttons during the installation. I’m looking at you Download.com! IMHO, this is as bad as Trojan viruses because the software author/distributor is adding in stuff that you, as the user, will undoubtedly not install under normal circumstances. A simple solution is to just not install software!
Another benefit of not installing software is that you can run applications on your work computer that are typically not able to be installed because the user does not have administrative rights on their machine to install said software. They do this for good reason because the common user does not pay heavy attention to the items being installed on a work computer. Unfortunately people do not typically treat work machines as they would treat their own and the result could be the inadvertent install of buggy, virus-laden software. Again, the solution? Don’t install it.
The solution? Use portable applications.
Portable applications are just as they read. They are software applications that are fully executable and most of the time fully usable without any installation. This post is being written using a portable version of Google Chrome. While a companies IT person would discourage the user of portable apps, and understandably so because it is not company-sanctioned software, it poses much less risk than a full install. Also, if you typically use someone else’s computer, you can keep the portable application on a USB drive so that it goes with you and all of your settings are preserved on that drive. This is great for person security and privacy as there is no trail left of your internet history, passwords, and/or settings. Note: this does not prevent the network from viewing your internet usage. Just because you are using your own software doesn’t mean they can’t see what you are doing nor does it bypass any firewalls. It just means your settings and preferences stay within that program that you can take with you. Always use the internet per the policy of your location.
A great portable application repository is Cameyo. I’ve used this website several times because they have a great public app library of commonly used applications, i.e. Google Chrome, Firefox, Camtasia, Notepad++, etc and their applications work very well. A huge bonus of Cameyo is that you can also virtualize (i.e. make portable) most any software that you can download. So if you want an application to be portable that is not in the public app library, then you can download the install file yourself to your computer and upload it for Cameyo to virtualize it. Alternatively, you can provide the direct download link to Cameyo and it will take care of everything, no need to download and re-upload. I’ve used this for CamStudio and it worked very well!
To use portable applications from Cameyo, either virtualize the application as described above using the online packager or download the pre-virtualized application from the public app library, double-click the file, and then you are running! No installation whatsoever.
 An alternative to Cameyo is to use a USB-based application library called PortableApps. I’ve used this before and its very convenient to carry around on a USB drive as it also defaults that all applications used via PortableApps save the documents or whatever to the USB drive. The image to the right shows the interface that appears when you run the PortableApps program from the USB drive. Using this, you can install any range of application from their library onto the USB drive, not your computer. Again, my more favorite uses on this was to have Google Chrome on the USB drive so that I could take around my favorites with me.
Portable applications carry with them the benefit of full software usage without installation and are extremely easy to get up and running, download and double-click! They maintain computer security without installing to the machine yet allow you to use your own preferred applications. Personally, I love it and will continue to use these applications as I continue to be productive in various locations.
Oh yes, usual disclaimer: all links provided in this blog post are non-monetary generating. I also am not on either Cameyo or PortableApps payroll and am not being compensated in any way for the information provided in this post. I am just an avid computer user who likes to share neat tips and tricks. Cheers!
Extending Wifi Range in a Rural Area: Post-Implementation
Overall, the project was a huge success. We were able to successfully combine two buildings into a single network across a span of approximately  350 feet of wooded area as seen below in the drawing of buildings A and B (descriptive eh?). However, it did not end up the way I had expected.
Problem 1: The routers do not see each other.
First, we had severe problems with securing the network. Part of the problem was that the routers could see each other but not connect to each other. To remedy this situation, I turned off the security on the routers. Once the security was disabled the routers were able to both see each other AND connect to each other. Since it is in a rural area, people jumping onto the network is not a high concern and therefore the security has been left off until I am able to journey back to the woods to do more testing and figure out the security settings that might work. For the time being, the wireless security settings are disabled and the routers are connected just fine.
Problem 2: The signal from the receiving wireless router in house B is not strong enough to push through the entire house.
This was more difficult to solve and luckily was not solved by me because I would have made it way more complicated. There happened to be an extra router laying around, a D-Link WBR-2310, and the occupants in building B decided to connect this router to the receiving router to see if it would re-broadcast the wireless signal resulting in a setup of a router behind a router. When the occupants called to tell me what they had done my immediate response was “that won’t work.” However they duly informed that they had already connected it and that it was, in fact, working. After doing some thinking about it I understood that what was occurring was that Router B was passing the internet connection to Router C and Router C was using its own DHCP to create a “new” network. While the goal of this entire plan was for both House A and B to share a common network, Router C prevented this from happening. Unfortunately, the WBR-2310 is unable to be modded with DD-WRT to make configuring it easer to possibly still share a common network, the D-Link normal firmware may be able to obtain a DHCP number from Router B, which is receiving a DHCP address from Router A, ergo any computer connected to Router C will receive an IP address from Router A. This has not yet been tested and I can provide an update when I can confirm the failure of this plan.
Developing a “beyond-local-network” remote access solution using Remote Desktop Connection (RDC)
First of all, if you are reading this little article and you’re not sure exactly what “remote desktop connection” is… this will probably be too advanced and you should use a commercial tool such as LogMeIn. LogMeIn is an excellent tool and I use it myself as well and there are even some features that LogMeIn does that RDC cannot do, namely RDC cannot reset or shut down the host computer unless you know DOS commands (hint: the command’s are “shutdown -r” for restart and “shutdown -s” for shutdown)
Step 1: Enable remote access on your host computer
In Windows 7, click on the Start menu icon and right-click on “Computer” and then from the menu that appears, click on “Properties”. In the window that pops up, on the left side click on “Remote Settings”. This will then open the System Properties window to the Remote Settings tab and allow you to enable remote access using RDC to your computer. I personally like the third option, “Allow connections only from computers running Remote Desktop with Network Level Authentication.” Per Windows, this is a more secure option that provides a higher level of security than the other option. However, in order to use this setting, you must be sure that the client computer (accessing computer) will have this NLA installed on the RDC application. To check on this, on the client computer, open up Remote Desktop Connection (in the Accessories part of the menu) and then click on the upper left icon and  click “About” and in the dialog box that appears to explain the version of RDC, it will also say “Network Level Authentication supported” as seen to the right.
Once you check the respective box, again, my preference is the third radio button, click “Ok”.
Step 2: Enable Dynamic DNS
Unfortunately and fortunately, most home internet connection have dynamic IP addresses assigned to them. When I explain to people what exactly this means, I tell them to imagine if you had your home address changed every couple of days, how would you tell people to enter in their GPS how to get to your house? The address wouldn’t be the same so the GPS would never be able to help the person get to your house! There is a solution to this problem and it exists with using a combination of Dynamic DNS as well as your router. Dynamic DNS is a free way to help give direction to your home’s IP address. HOWEVER, in order for this to also work, you must have a “beacon” of some kind to let Dynamic DNS know where you are. Most routers, namely Linksys routers, have this inside their router software.
Let’s not get ahead of ourselves however, first lets create a Dynamic DNS account.

Hostname is the address name you want to give yourself, it can be anything! Make it something easy to remember however and something not embarrassing and essentially this will be what you type into RDC to access your computer:
your-chosen-address.dyndns.org
I like to choose from the drop-down to the right of the Hostname “dyndns.org” because that was what it originally was, however, it doesn’t really matter which one your choose as it is only a reflection of your preference in address naming.
Leave Wildcard unchecked because you are doing this using the free version and don’t want to pay… besides it won’t let you check it anyways. Leave “Host with IP Address” checked. For your IP address, the website is taking the IP address of your current IP address where you are at that moment. Simply click on the link and it will put your IP address in the field for you. Leave IPv6 blank and leave Mail Routing unchecked. You have done the nitty-gritty work for getting your Dynamic DNS account set up so just finish up the process by clicking “Add to Cart” and then finish the checkout process.
Step 3: Enable Dynamic DNS access on your router
Now that we have the “directions” to your IP address done, we have to tell the “directions” where to go! And to do that we have to configure your router to let Dynamic DNS know where you are at so it can follow you when your internet provider changes your IP address. Linksys routers are most commonly used in homes per my own experiences though most routers have something very similar as they all like to compete with each other (consumer FTW!). To set up your router, open up Firefox, Internet Explorer, Google Chrome, Safari, or whatever and type in 192.168.1.1 …. if that doesn’t work type in 192.168.0.1 …. if that doesn’t work then look up your router to try to figure out how to get into the router’s software or get out the CD that came with your router.
Once in the router by typing in the correct username and password (typically a combination of admin and administrator or “blank”) you will be at the Setup screen with several tabs, one of which is DDNS. Click on DDNS and you will go to a screen showing a drop-down list and from this list, choose DynDSN.org. In the username field type in the username to your Dynamic DNS account, in the password field type in your Dynamic DNS password, and in the Host Name field, type in the address that you previously gave yourself: your-chose-address.dyndns.org. Don’t forget the dyndns.org part on your address!!! After you do that, Save your settings and now your router will serve as your home’s IP address beacon.
What will happen now, is your router will report to Dynamic DNS what your IP address is that your internet provider has given you. When you type in your Dynamic DNS hostname address in RDC, what it is doing is asking Dynamic DNS where your home is located. So Dynamic DNS is giving your RDC application directions to get to your home’s IP address that was given to it by your router, thus enabling you to access your home computer from anywhere in the world with an active internet connection.
Step 4: Tell your router where your computer is on your network
The function of your home router is to not only let several computers in your home access the internet at the same time, but it is also to protect your from outside intrusions such as hacking, viruses, etc using its built-in firewall. Routers don’t always succeed at this but it is better than connecting your computer directly to your cable/DSL modem. What you want to do now is tell your router which computer you want it to look for when you want to use RDC to connect to your computer.
On the Setup tab
Still in your Linksys router software, click on the “Applications and Gaming” and then you should already be on the “Port Range Forwarding” tab. In the first blank box under Applications, type in something descriptive such as RDC. Then type in both the external port and internal port boxes “3389” without the quotes. Under the protocol column, I selected both. Remote desktop protocol technically uses TCP, but I selected both because that’s what I do, I try and satisfy every scenario. Then check the checkbox for “enabled” and hit the button “Save Settings” at the bottom of the screen.
Step 4: Log in!
Once you have all of these things done, the only thing left to do is to open up your Remote Desktop Connection application on your client computer and type in the address “your-chosen-name.dyndns.org” but don’t include the quotes. You don’t need to type in the port addresses because RDC knows to use 3389. You should have a login screen asking for your username, password, and domain. Type in your Windows username and your password and hit “ok”. If you have a domain configured on your home network (most don’t have this advanced setup done), then you can type it in otherwise it should work fine. Alright, that should do it and now you can access your home computer from anywhere you have an active internet connection and the Remote Desktop Connection ability! You can use it on your iPad, Android Phone, undoubtedly your Windows phone, Mac’s, or PC’s. I use PocketCloud on my iPad and it does well, though it seems a bit laggy (Disclaimer: Pocketcloud does not pay me to say that nor am I generating revenue… just telling you what I use). I haven’t tried hard enough to see if its my home network speed, iPad speed, or computer… but it works for me. Enjoy!
Extending Wifi Range in a Rural Area: During Implementation
The previously posted entry described my goals with rural wifi and how I was going to accomplish this task. As explained, I procured the following items:
- 2 x WRT160N (refurbished and flashed with DDWRT)
- 2 x SPAPG20
- TRENDnet Low Loss Reverse SMA Female to N-Type Male Weatherproof Connector Cable (8M, 26.2ft.) TEW-L208 (at most 25 feet due to rapid signal degradation)
I learned that apparently the wifi signal (2.3-2.5Ghz approximately) degrades very quickly, which is why I was advised by the salesman of the antenna to not exceed a cable length of 25 feet. Before I journeyed to the harsh rural land where the extended range network will be implemented, I made sure that the routers would be able to not only see each other, but also convey the internet from a previous access point using the directions from DD-WRT for setting up a client bridged network. After hours of the system not working, I resorted to my primal instincts and started slapping the routers and yelling rhetorical questions to the machines. I decided to stop wasting time however and scavenged the forums discussing client bridged modes and learned something new: DO NOT USE WPA2 FOR CLIENT BRIDGED. My router that was broadcasting the internet from the cable modem was set up with WPA2 encryption and apparently this simply does not work. I changed the encryption to WPA, but alas, it still did not work. After again growing quite frustrated, I turned the encryption off. After a few moments of simply “not thinking”, I noticed that one of the WRT160N routers was showing a MAC address signal strength that was not its own (I had memorized their MAC addresses by this point). I quickly had my laptop connect to that specific router (laptop wired to WRT160N which was wirelessly connected to internet wireless router… henceforth known as “base” router”) and the internet came through just fine. The first wireless hop was working. I went to the second WRT160N router and set it up with a router name of Router2 and connected my laptop via Ethernet to it now. Router2 then showed the MAC address of Router1 and base router. This presented a problem to me… how am I going to test the second air hop when Router2 is able to pull the signal from base router and not Router1? I decided to “solve” this by connecting the cable modem directly to Router1 (bypassing base router) and the internet worked when I was connected to Router2, which means that they were talking to each other. I cannot stress enough with my learning experience in the hours that I did this: THE CHANGES YOU MAKE ON THE ROUTERS DO NOT HAPPEN IMMEDIATELY. When you make a change in the settings on the router, give it some time. Walk away and make a sandwich or something and by the time you get back it should be working… if it is going to work (read: don’t use WPA2).
So now my setup was ready for real world testing:
[cable modem]—–[base wireless router]~~air hop~~[Router1]~~air hop~~[Router2]
I journeyed to the rural area with some friends and we mounted the SPAPG20’s on long PVC pipes because we were not quite sold on drilling holes for the cords yet in the house until the tests proved successful for internet reception. For these tests, we did not have access to a cable modem due to the rural area, instead we used Sierra Wireless Overdrive from Sprint which served as the base wireless router. At the origin building (Building1), we set up the Overdrive and Router 1 with the high gain antenna connected via the RSMA-N male cable to one of the WRT160N’s antenna spots (therefore the WRT160N only had one little black antenna attached to it instead of two). At the remote location, on the other side of the small and sparse tree-line, we set up Router2 very similar to Router1 (high gain antenna connected in lieu of one of the little black antenna’s in the back) and connected a laptop to Router2. We pointed the antenna’s to each other, turned on the Overdrive, and waited for a few moments. Luckily, the WRT160N’s with DD-WRT have a feature built in that not only lets you see the MAC address of the other router, but also the signal strength. After a few moments, we had a 33% signal strength. Then the wind started blowing and the signal strength would jump around but the lowest it would get is 15%. On a good broadband connection that may not affect speed, but on a 3G (barely) signal as the internet source, it probably would not be very fast. I loaded up the first web page I could think of: Google. The page loaded quickly, but not quickly so much for me to suspect it was pulling from my computers cache. Suspecting it still may be pulling from my system cache, I loaded up a separate webpage that is always different, my email. The page loaded (albeit slowly), but it loaded. The air hops had worked! I then tried to load up YouTube… it started loading up and was continuing, but after a few minutes my patience had run out and I decided to view this internet not as a broadband connection, but more like a dial-up connection until a more speedy broadband connection is implemented in the area (which is in progress).
Overall, the system worked. It was not quite what I had expected and ended up costing as much as an Ayrstone probably would have cost anyways (my goal was to save money overall), but it worked. Would I use it for my own internet? He!l no, I don’t live in the boones, 16mbps down and minimum 1mbps up. There ain’t no way I’m living out yonder. But honestly no, I think next time I would just skip the headache and try the Ayrstone (or something commercially similar) first and see how that goes.
Disclaimer: The websites listed in here with specific brand names are not paying this author, it is simply my opinion and what I had done.)
